I know you’re seeking to reap the maximum benefit out of your refrigerator without pushing up the electricity bills, isn’t it? I’ve created this blog to help you out in the same by letting you know how to change the refrigerator gasket.
There are a few steps, like, let’s say, recognizing the signs of gasket replacement, removing an old gasket, gathering the vital tools you need for the process, and a few more. If you prepare, clean, and maintain it regularly, then your gasket is going to stay in top condition for a really long period.
So, this is a short blog that does not consume much time. Let’s move on to the process.
Signs It’s Time for a Gasket Change: Recognizing the Telltale Indicators

First of all, you need to start by inspecting your gasket and checking whether there are some tears or cracks or such a variant here.
Also, if your gasket isn’t forming a tight seal around the refrigerator door any longer, you would need to replace it. Another sign is excessive condensation inside your refrigerator or freezer. If this is the case with your refrigerator as well, then there is a great chance that your gasket has already failed.
A worn-out gasket also leads to air leaks, which means the refrigerator tries exceptionally hard to maintain a regular temperature inside. That increases the load on the compressor, which finally shoots up your electricity bills.
Finally, mould growth is another thing that shows that you are now supposed to take a look over your gasket’s functionality. You will be able to see some moisture in the filtration area.
Gathering Your Tools: Essential Equipment for the Job

- Replacement gasket: Obviously, you’ll need to have a new gasket if you want to replace your old one and make sure it’s compatible.
- Screwdriver: I personally use a flathead screwdriver which helps me in removing the screws in no time. Besides that, it also helps in holding the gasket perfectly in its place by putting the new screws.
- Putty knife: If you want to gently pry off your old gasket from the refrigerator door, then nothing can be more handy than a putty knife.
- Rubbing alcohol: You will have to clean the door before removing the gasket, and rubbing alcohol is a nice way to save your time in the process.
- Hair dryer or heat gun: A hair dryer or heat gun is not always needed, but it can help in easily removing the old gasket.
Step-by-Step Guide: How to Replace Your Refrigerator Gasket

First of all, you need to gather all the vital tools as mentioned above, including the replacement gasket, putty knife, screwdriver, rubbing alcohol and a hair dryer.
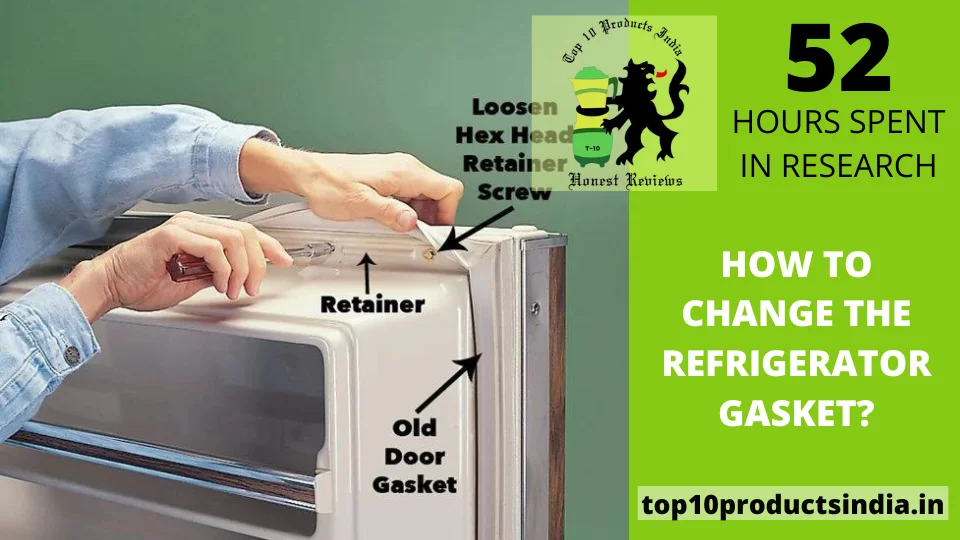
Now move yourself to the very first step, which is loosening the screws that hold the old gasket in place, and don’t show any extra pace while peeling off the old gasket. Now wipe down the surface area where the gasket attaches so that there is no residue left behind.
Soften the new gasket by placing it in lukewarm water. You can also use a heat gun or a hair dryer. Now, your new gasket installation process is almost complete. You just need to press the new gasket into its place and ensure that the seal is tight enough so that you don’t face any trouble later on.
Preparation is Key: Getting Your Refrigerator Ready for Gasket Replacement
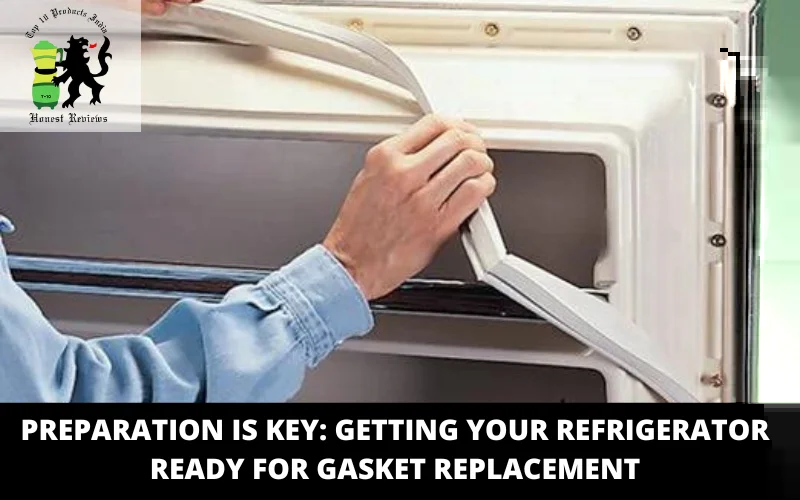
If you want to replace the refrigerator gasket perfectly, then you need to pay special attention to preparation. The very first step is to inspect the old gasket to see where it really needs to be replaced, or you can roll on with this one for a longer time.
If there’s a problem, just start by clearing the area around your refrigerator door and remove all items stored there so that nothing troubles you in the middle of the replacement process. Also, make sure you are safely turning off your refrigerator before starting the process; this is a step that you can certainly not forget.
Switch it off and remove it from the main power source. After that, double-check that your new refrigerator gasket is perfect. It doesn’t have any manufacturing faults. Otherwise, your work will be doubled after the new gasket is perfectly replaced. Thoroughly check everything. There is no need to rush. Just check that there is absolutely no problem now.
Removing the Old Gasket: Tips and Tricks for a Smooth Removal Process

- Loosen the screws using a screwdriver that secures the old gasket.
- Pry the old gasket away with the help of a putty knife.
- Apply slight pressure so that there is no damage to the door surface. A heat gun is a perfect thing now to soften the stubborn gasket.
- After removing the old gasket, I put some time into cleaning the area.
Installing the New Gasket: Ensuring a Proper Fit for Maximum Efficiency

I know removing and replacing the refrigerator gasket isn’t a task you do every single day. So you need to be pretty focused when you are doing it, especially when it’s your first time. This will maximize your refrigerator’s energy. Just position the new gasket along with your refrigerator door’s edges. Just start from one corner and gently press the gasket into place.
The fit is supposed to be snug, and the seal form should be tight enough. After installing the gasket, use screws to place and secure it perfectly. There should be no leaks or gaps; otherwise, you’ll have to carry out the process twice.
Try out the door to see whether it is closing properly. I would also recommend you watch a couple of YouTube videos if you are still confused about the process.
Testing and Adjusting: Verifying the Seal and Making Necessary Adjustments

Now, it’s not like you are a pro at removing and replacing the gasket. So, there are still some chances that you will do the job slightly imperfectly.
After installing, you need to check the gaps and whether the seal is tight or not. You can use a flashlight to check out if any light is shining through the gaps of the seal, and if there are some, then these areas do need some adjustments.
You need to adjust the gasket properly by gently pulling it outwards and ensuring a perfect seal around the whole door. Finally, you need to test the door closure. If you feel like your door is not closing perfectly, then you have certainly not done your job perfectly.
You can ask somebody else in your family to try the same and ask whether it was normal or there was some problem with the closing. If there is some problem, don’t hesitate to make the required adjustments.
Maintenance Tips: Keeping Your Refrigerator Gasket in Top Condition

- Clean regularly: Mild detergent and water are enough to clean the gasket regularly and remove unwanted debris.
- Avoid harsh chemicals: You might have watched advertisements for various chemicals and abrasive cleaners that claim that the task can be done perfectly and cleaning can be done well. That’s all unwanted stuff. Be mature. You already know what sort of chemicals and abrasives might harm your appliance.
- Check for wear: Tears or cracks are easily visible most of the time in the refrigerator gasket, and if you see them, don’t wait for days to complete that replacement process because it will keep on shooting up your electricity bills.
- Address mould or mildew: Oh, come on, I have already explained the thing up there. If there’s some mould, there’s certainly going to be a big problem not just with the refrigerator but even with your health. This mould might attack the food kept inside, and you’ll find yourself in the hospital soon.
- Ensure proper alignment: See, don’t rush in this process. It requires perfection. The refrigerator door is supposed to be perfectly aligned so that there is no extra strain on the gasket, and this way, it will have a longer life.